Showing posts with label felt. Show all posts

Sunday, 28 September 2014

Sweet Animal Faces Pillows for Nursery

Animal Pillows
fleece animal faces pillows cat, mouse bunny

I have wanted to make these for such a long time!


A Cat, a Mouse and a Bunny Rabbit. They have felt eyes and noses and whiskers.


baby gift set mouse pillow and matching storage caddy
 They match the diaper caddies.
baby nursery red storage basket and kitten pillow

pink bunny face pillow and fabric basket gift set
Aren't they cute?

Happy Sunday.

Sunday, 27 April 2014

Fabrics Baskets for Spring

I got round to sewing that check green cotton I was not so keen on, and it turned out nice!

Green check fabric basket with outside pockets and handles front
 I divided the front to one big and two small pockets
Green check fabric basket with outside pockets and handles back
 and the back to 4 pockets
Green check fabric basket cosmetics top view
 Fits lots of toiletries inside
Green check fabric basket with toiletries
and little things all round

I also found a remnant from a long time ago and made a smaller basket

beige fabric basket side view

beige fabric basket slip pockets interior
 It has handy pockets for phone, i -pod, cards and space in the middle for chargers and things.
 beige fabric basket held by hand
Would work well as a "come home and empty your pockets bin", all in one place, tidy and scratch free.

Last but not least, I bought a length of what I thought was dark red felt, but looks a bit like wine.

I attempted a fox pillow with it.

fox mini felt pillow
 I made the mistake of using cotton for the white parts, which has no stretch
fox mini felt pillow side view
 The eyes and nose are also made of felt, stitched with applique
fox mini felt pillow front view
 I am quite proud of piecing the curves (first time ever I pieced curves) and getting the ears even (many times sewn uneven ears).
fox mini felt pillow back view
Would like to make more of these in future

What did you sew this weekend?

Thursday, 6 March 2014

Fox Felt Brooch

Fox Felt Brooch


A few weeks ago I made this little fox brooch out of felt.


I liked how it looked but it is so small, it had to be hand sewn and I worry about my hand sewing!


Normally, I go for the perfection of the machine stitch.

I was in two minds whether to persevere and make more fox brooches, or just forget about it.

Last week I had my first ever order from Australia in my etsy shop.

In a moment of spontaneity and excitement, I included the little brooch as a free gift. Thinking it will travel all the way from a cold and wet UK to sunny OZ, the other side of the planet, and live a happy life there.

That makes me feel very happy inside.

xx

Tuesday, 5 November 2013

Upcycled Christmas- Pimp up your old Christmas Ornaments with Embroidery

Embroidered Christmas


Halloween is over, bonfire night is over and everyone's mind has turned to Christmas. If you are looking for cost effective ways to update existing ornaments, consider a bit of embroidery. Stitching and handcrafted are very in at the moment, as people are appreciating the beauty of handmade. Take a look at these beautiful ideas to be inspired
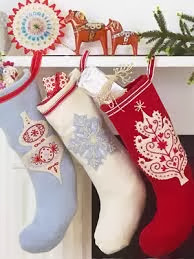
Christmas Felt Stocking
Contrasting Stitches Holiday Felt Stockings
Felt Hearts and Gold Thread and Bead Detail
Sequents Robin Hanging Felt Christmas Tree Ornament
For the accomplished embroidery enthusiast, beautiful embroidered Christmas Cushions.


If you do decide to make something, only buy WOOL felt, anything else falls apart.

If you'd rather shop, Not in the High Street, Etsy, Folksy and Misi have wonderful selections of unique handmade Christmas gifts and for you to make your home ready for the Holidays.

Monday, 28 October 2013

Fox Coin Purse Tutorial with Felt and Wool

Fox Coin Purse Tutorial

My last attempt to make these has been a learning curve.

New and improved tutorial is here!

Fox Purse Wool and Felt
This tutorial assumes you know how to make a zipper purse- it is all about the fox!

Start by drawing your fox on paper and placing design on you outer piece to ensure a good fit.


Cut the felt pieces based on the drawing as required. For tiny curves sharp manicure scissors work best.

Once you are happy with the placement of the paper design, start adding the felt layers in reverse order to how it appears and stitch.

Here, I am adding the tail first.

Followed by the body

Keep checking placement each time you add a piece of felt by placing paper design on top and adjusting.

I am now adding the head and that is the end of my brown thread sewing. Switch to white thread.


Add all the white pieces now and stitch, You can use spay adhesive if you like. I found felt has grip and there was no need for me.


Stitch slowly, if necessary adjusting the length/width of the stitch to a smaller one near corners like the ears and the tail end, so you do not get a boxy end.


My fox is looking cute already!

This is another sleeping fox. Switch to black thread now and sew nose and eyes. This stage can be done my machine of by hand. I did a bit of both.


One you finish your panel, make your zipper purse as usual.

Here are some I made.


Fox Purses handmadebyevarose

Apologies about the photos. I have a new camera and still working out the settings. I was so excited to add these cuties I did not read the instructions!

You can buy these cuties and more foxes in my Etsy shop Fox Purses

Friday, 18 October 2013

Felt Applique Ideas

Sewing with Felt Applique will be another milestone in my sewing skills repertoire additions. In fact, it is so big for me that I can't wait to start.

It is very early on Saturday morning and I can't sleep because I am too excited. Today I will be sewing my all new improved foxy purses.

The ones posted earlier this week in post How to make foxy wool and felt coin purse were prototypes and I have learned from my mistakes. New 100% wool felt from The Wool Felt Company has arrived and I am set to go!

I have also designed a new sleeping fox pattern that I want to try out.

Instead of using the heat bond applique paper, I will use freezer paper which comes off felt easily. For a great tutorial check out Simple Machine Applique by Sew Mama Sew and this one from Live Creatively Now which shows some clever tips.

I will not be using any backing fabric as I am sewing on thick wool and think it should be ok. Hopefully I can show you some good results later.

Here are some beautiful works from others for inspiration

Felt snowman cushion

Modern felt swirls pillow
Forest Felt mini landscape


Felt Penguin baby


Eva

Monday, 14 October 2013

Felt Coin Purse

There seem to be owls everywhere this year.

But my heart was set on another forest animal: Beautiful foxes! I have been working on the idea of incorporating a fox into a grown-up purse for a while and finally got to make them this weekend.

I thought making a foxy zippered coin purse would be fun and useful, as I had some left over merino wool and cashmere blend fabric. I cut my wool fabric into rectangles, allowing 1 inch either side for seams.

I made the foxes using wool blend felt, cut into shapes and stitched directly onto the main fabric.

Initially, I attached fusible interfacing (bondaweb) to the felt, but found it showed when I placed the fox in the black background.

Using applique paper was also a failure. Ironing the paper on gave me a great stiff felt which made very easy cutting the small shapes. But when it was time to peel the paper off and be left with a sticky side, it would not come off, it just ripped the felt. Again placing the shape with the paper on the purse, showed the white edges of the paper and made a crinkly noise.

Finally, I just lay the felt on. I realised I should have bought the top quality 100% wool felt then rather than the wool blend, as the 100% wool is thicker and would need no backing. But these are kinda prototypes!

When it is time to stitch the applique shapes for the fox, it is a good idea to number the pieces in the order they need to go on. Here the brown face was first, followed by the white parts, followed by the black nose and ear insets. I stitched the eyes setting the machine stitch width and length to zero and slightly pulled the fabric to make thicker eyes. For the second coin purse, I used this setting to make the feet of the fox and his nose too.


My stitching was made with zig zag. The straight line would have looked more neat but I was not able to get really close to the edge of the tiny shapes. I would not recommend laying the stitches thick like I did, as they shine in the light and detract from the warmth of the felt. I figured out the zig zag set at number 2 both for length and width would have worked best.

I then made the purse by attaching an 8 inch zipper and lining.

It was my first attempt in sewing home made applique and there is definitely lots of room for improvement..but I love them!

Hope you do too. :)
Related Posts Plugin for WordPress, Blogger...